Download And Demo Here
1/ Installing Template
If you want to install the Median UI template successfully, please follow us.
This simple tutorial to learn How to Install Median UI blogger Template:
Step1: The first Download Template and save the file to PC. Then Extract the File and find the file Median UI v1.3.xml and then open it with the Notepad program.
When you open the file Median UI v1.3.xml Notepad you see code.
Step 2: Go to Log in your Blogger dashboard go to Template section and you will see the photo.
Now you click Edit HTML button, you see a photo below, and the first click anywhere in the code box and Press Ctrl+a and delete this code. After you delete this code you go to copy the code template that you open in Notepad and Past in the code box blogger dashboard and click Save button.
2/ How To Install Logo In Your Blog
Follow this simple guide to learn How To Install Logo In Your Blog.
First, go to the Dashboard Blogger go to Layout and find the photo.
Then click Edit button (Left Header Widget Area.) then add your logo and then click Save button.
3/ How to Create Contact Us page in blogger
Hello and Welcome to my blog, This content will show you How to create a contact form for blogger. If you have a blog in blogger you must add the Contact or contact us page to the menu to give your user contact with you. The blog has a Contact Form too but it's not so good for looking. So This article will show you how to add a contact form for your blogger.
Add Contact Us Page in Blogger
Step 1: First of all, you can add contact us a form of blogger on your website. So your blog will enable the function. let's go to do it.
you go to your blogger admin and go to Lay Out. and click on the Add a Gadget, so you will to see Pop up 1 and find More Gargets click on it and then find Contact Form and the final Click on the plus button, Now you add blogger contact form Successfully on your website. And then you're to hide the contact form of the blogger and create a new contact form style in a static contact page on your blogger.
Step 2: To hide the Blogger Contact form from your blog and can follow this step:
First, go to Template and choose Edit HTML button. now you see a new tap on the HTML and click HTMLarea and then Press Ctrl+F on your keyboard, you will see a search box. And then Copy This Code ]]></b:skin> past in Search Box and hit Enter. The next you just copy this code:
 div#ContactForm1 {
         display: none !important;
         }
past above this code ]]></b:skin> and the final click button Save and you are done. You can refresh your blog and you will see the contact form on the blogger widget is hidden.
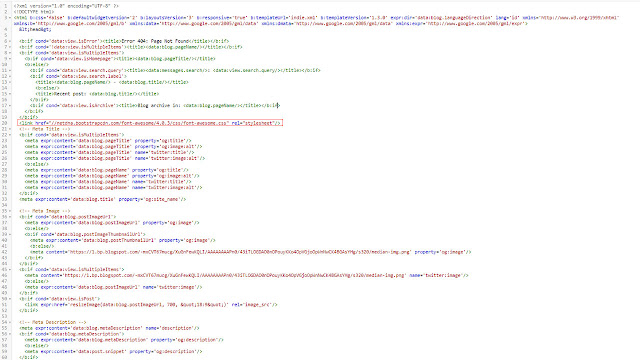
Step 3: I have the best font icon in my contact form for my website. So you can insert this Stylesheet to you blogger
<link href="//netdna.bootstrapcdn.com/font-awesome/4.0.3/css/font-awesome.css" rel="stylesheet"/>
The first Go to Theme and choose HTML and then you will see HTML area pres Ctrl+F on your keyboard and Past this code </head> to the Search box. The next you copy Stylesheed code to past right above This code </head>
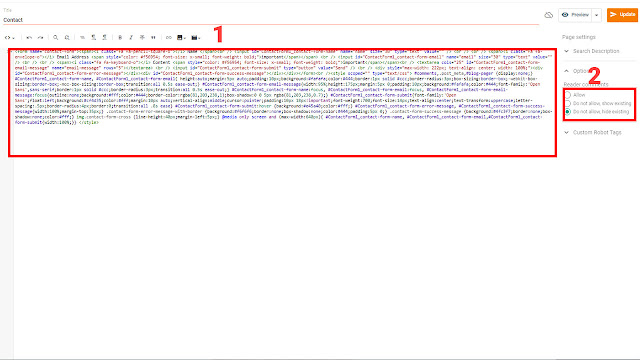
Step 4: Now this step is the final, you go to Page Manu and click the new page button. The title is Contact or Contact Us and then click on HTML tap, Copy This code :
<form name="contact-form"><span><i class="fa fa-pencil-square-o"></i> Name </span><br /> <input id="ContactForm1_contact-form-name" name="name" size="30" type="text" value="" /> <br /> <br /> <span><i class="fa fa-envelope-o"></i> Email Address <span style="color: #f56954; font-size: x-small; font-weight: bold;">important</span></span> <br /> <input id="ContactForm1_contact-form-email" name="email" size="30" type="text" value="" /> <br /> <br /> <span><i class="fa fa-keyboard-o"></i> Content <span style="color: #f56954; font-size: x-small; font-weight: bold;">important</span></span><br /> <textarea cols="25" id="ContactForm1_contact-form-email-message" name="email-message" rows="5"></textarea> <br /> <input id="ContactForm1_contact-form-submit" type="button" value="Send" /> <br /> <div style="max-width: 222px; text-align: center; width: 100%;"><div id="ContactForm1_contact-form-error-message"></div><div id="ContactForm1_contact-form-success-message"></div></div></form><br /><style scoped="" type="text/css"> #comments,.post_meta,#blog-pager {display:none;} #ContactForm1_contact-form-name, #ContactForm1_contact-form-email{ height:auto;margin:5px auto;padding:10px;background:#fafafa;color:#444;border:1px solid #ccc;border-radius:3px;box-sizing:border-box;-webkit-box-sizing:border-box;-moz-box-sizing:border-box;transition:all 0.5s ease-out;} #ContactForm1_contact-form-email-message{width:95%;height:175px;margin:5px 0;padding:10px;background:#fafafa;color:#444;font-family:'Open Sans',sans-serif;border:1px solid #ccc;border-radius:3px;transition:all 0.5s ease-out;} #ContactForm1_contact-form-name:focus, #ContactForm1_contact-form-email:focus, #ContactForm1_contact-form-email-message:focus{outline:none;background:#fff;color:#444;border-color:rgba(81,203,238,1);box-shadow:0 0 5px rgba(81,203,238,0.7);} #ContactForm1_contact-form-submit{font-family:'Open Sans';float:left;background:#cf4d35;color:#fff;margin:10px auto;vertical-align:middle;cursor:pointer;padding:10px 18px!important;font-weight:700;font-size:14px;text-align:center;text-transform:uppercase;letter-spacing:.5px;border-radius:4px;border:0;transition:all .8s ease} #ContactForm1_contact-form-submit:hover {background:#e45a40;color:#fff;} #ContactForm1_contact-form-error-message, #ContactForm1_contact-form-success-message{width:100%;margin-top:35px;} .contact-form-error-message-with-border {background:#f6f6f6;border:none;box-shadow:none;color:#444;padding:5px 0;} .contact-form-success-message {background:#4fc3f7;border:none;box-shadow:none;color:#fff;} img.contact-form-cross {line-height:40px;margin-left:5px;} @media only screen and (max-width:640px){ #ContactForm1_contact-form-name, #ContactForm1_contact-form-email,#ContactForm1_contact-form-submit{width:100%;}} </style>
Past in HTML area. and you see Option choose Don't allow hide existing compose mode and click Done. the final click button Publish and you can test it, you will see contact us form on your website.
yes, this is how to create a Contact page in Blogger for your website. Thanks For going to my website, If you have a problem you can Comment and you can share with your friend.
4/ How to create privacy page
1:  <h1>
2:  Privacy Policy for Meng Hieng</h1>
3:  <div style="text-align: justify;">
4:  At <b>Meng Hieng</b>, accessible from <b>menghieng.blogspot.com</b>, one of our main priorities is the privacy of our visitors. This Privacy Policy document contains types of information that is collected and recorded by <b>Meng Hieng</b> and how we use it.</div>
5:  <div style="text-align: justify;">
6:  If you have additional questions or require more information about our Privacy Policy, do not hesitate to <a href="https://menghieng.blogspot.com/p/contact.html">contact us</a>.</div>
7:  <h2>
8:  Log Files</h2>
9:  <div style="text-align: justify;">
10:  <b>Meng Hieng</b> follows a standard procedure of using log files. These files log visitors when they visit websites. All hosting companies do this and a part of hosting services' analytics. The information collected by log files include internet protocol (IP) addresses, browser type, Internet Service Provider (ISP), date and time stamp, referring/exit pages, and possibly the number of clicks. These are not linked to any information that is personally identifiable. The purpose of the information is for analyzing trends, administering the site, tracking users' movement on the website, and gathering demographic information.</div>
11:  <h2>
12:  Cookies and Web Beacons</h2>
13:  <div style="text-align: justify;">
14:  Like any other website, <b>Meng Hieng</b> uses 'cookies'. These cookies are used to store information including visitors' preferences, and the pages on the website that the visitor accessed or visited. The information is used to optimize the users' experience by customizing our web page content based on visitors' browser type and/or other information.</div>
15:  <div style="text-align: justify;">
16:  For more general information on cookies, please read the "What Are Cookies" article on <a href="https://www.cookieconsent.com/what-are-cookies/">Cookie Consent website</a>.</div>
17:  <h2>
18:  Google DoubleClick DART Cookie</h2>
19:  <div style="text-align: justify;">
20:  Google is one of a third-party vendor on our site. It also uses cookies, known as DART cookies, to serve ads to our site visitors based upon their visit to <a href="http://menghieng.blogspot.com/">menghieng.blogspot.com</a> and other sites on the internet. However, visitors may choose to decline the use of DART cookies by visiting the Google ad and content network Privacy Policy at the following URL – <a href="https://policies.google.com/technologies/ads">https://policies.google.com/technologies/ads</a></div>
21:  <h2 style="text-align: justify;">
22:  Our Advertising Partners</h2>
23:  <div style="text-align: justify;">
24:  Some of advertisers on our site may use cookies and web beacons. Our advertising partners are listed below. Each of our advertising partners has their own Privacy Policy for their policies on user data. For easier access, we hyperlinked to their Privacy Policies below.</div>
25:  <ul>
26:  <li>
27:  Google
28:  <a href="https://policies.google.com/technologies/ads">https://policies.google.com/technologies/ads</a>
29:  </li>
30:  </ul>
31:  <h2>
32:  Privacy Policies</h2>
33:  <div style="text-align: justify;">
34:  You may consult this list to find the Privacy Policy for each of the advertising partners of <b>Meng Hieng</b>. Our Privacy Policy was created with the help of the <a href="https://www.privacypolicygenerator.org/">Free Privacy Policy Generator</a> and the <a href="https://www.privacypolicyonline.com/privacy-policy-generator/">Privacy Policy Generator Online</a>.</div>
35:  <div style="text-align: justify;">
36:  Third-party ad servers or ad networks uses technologies like cookies, JavaScript, or Web Beacons that are used in their respective advertisements and links that appear on <b>Meng Hieng</b>, which are sent directly to users' browser. They automatically receive your IP address when this occurs. These technologies are used to measure the effectiveness of their advertising campaigns and/or to personalize the advertising content that you see on websites that you visit.</div>
37:  <div style="text-align: justify;">
38:  Note that <b>Meng Hieng </b>has no access to or control over these cookies that are used by third-party advertisers.</div>
39:  <h2>
40:  Third Party Privacy Policies</h2>
41:  <div style="text-align: justify;">
42:  <b>Meng Hieng</b>'s Privacy Policy does not apply to other advertisers or websites. Thus, we are advising you to consult the respective Privacy Policies of these third-party ad servers for more detailed information. It may include their practices and instructions about how to opt-out of certain options. </div>
43:  <div style="text-align: justify;">
44:  You can choose to disable cookies through your individual browser options. To know more detailed information about cookie management with specific web browsers, it can be found at the browsers' respective websites. What Are Cookies?</div>
45:  <h2>
46:  Children's Information</h2>
47:  <div style="text-align: justify;">
48:  Another part of our priority is adding protection for children while using the internet. We encourage parents and guardians to observe, participate in, and/or monitor and guide their online activity.</div>
49:  <div style="text-align: justify;">
50:  <b>Meng Hieng</b> does not knowingly collect any Personal Identifiable Information from children under the age of 13. If you think that your child provided this kind of information on our website, we strongly encourage you to contact us immediately and we will do our best efforts to promptly remove such information from our records.</div>
51:  <h2>
52:  Online Privacy Policy Only</h2>
53:  <div style="text-align: justify;">
54:  This Privacy Policy applies only to our online activities and is valid for visitors to our website with regards to the information that they shared and/or collect in <b>Meng Hieng</b>. This policy is not applicable to any information collected offline or via channels other than this website.</div>
55:  <h2>
56:  Consent</h2>
57:  <div style="text-align: justify;">
58:  By using our website, you hereby consent to our Privacy Policy and agree to its Terms and Conditions.</div>
5/ How to create Sitemap page
Sitemap code installation code for Template Median UI
1:  <div class="sitemaps" id="sitemaps"> <div class="loading">Loading....</div> </div>
2:  <script>/*<![CDATA[*/ /* Blogger Sitemap Dropdown */ var toc_config = {containerId:'sitemaps', showNew:0, sortAlphabetically:{thePanel:true, theList:true}, activePanel:1, slideSpeed:{down:400, up:400}, slideEasing:{down: null, up: null}, slideCallback:{down:function(){}, up:function(){}}, clickCallback:function(){}, jsonCallback:'sitemaps',delayLoading: 0}; window.onload = function(){ !function(e,o){var t=o.getElementById(toc_config.containerId),c=o.getElementsByTagName("head")[0],n=[];e[toc_config.jsonCallback]=function(e){for(var o,c,i=e.feed.entry,a=e.feed.category,l="",s=0,d=a.length;d>s;++s)n.push(a[s].term);for(var r=0,f=i.length;f>r;++r)(toc_config.showNew||toc_config.showNew>0)&&r<toc_config.showNew+1&&(i[r].title.$t+=" %new%");i=toc_config.sortAlphabetically.theList?i.sort(function(e,o){return e.title.$t.localeCompare(o.title.$t)}):i,toc_config.sortAlphabetically.thePanel&&n.sort();for(var g=0,h=n.length;h>g;++g){l+='<div class=\"sitemap-box\"><h4 class=\"judul\">'+n[g]+'</h4>',l+='<div class=\"konten\"><ol>';for(var _=0,p=i.length;p>_;++_){o=i[_].title.$t;for(var w=0,u=i[_].link.length;u>w;++w)if("alternate"==i[_].link[w].rel){c=i[_].link[w].href;break}for(var v=0,m=i[_].category.length;m>v;++v)n[g]==i[_].category[v].term&&(l+='<li><a href=\"'+c+'\" title=\"'+o.replace(/ \%new\%$/,"")+'\">'+o.replace(/ \%new\%$/,"")+'</a></li>')}l+='</ol></div></div>'}t.innerHTML=l,"undefined"!=typeof jQuery&&($("#"+toc_config.containerId+" .konten").hide(),$("#"+toc_config.containerId+" .judul").click(function(){$(this).hasClass("aktif")||(toc_config.clickCallback(this),$("#"+toc_config.containerId+" .judul").removeClass("aktif").next().slideUp(toc_config.slideSpeed.up,toc_config.slideEasing.up,toc_config.slideCallback.up),$(this).addClass("aktif").next().slideDown(toc_config.slideSpeed.down,toc_config.slideEasing.down,toc_config.slideCallback.down))}).eq(toc_config.activePanel-1).addClass("aktif").next().slideDown(toc_config.slideSpeed.down,toc_config.slideEasing.down,toc_config.slideCallback.down))};var i=o.createElement("script");i.src="https://menghieng.blogspot.com/feeds/posts/summary?alt=json-in-script&max-results=9999&callback="+toc_config.jsonCallback,"onload"==toc_config.delayLoading?e.onload=function(){c.appendChild(i)}:e.setTimeout(function(){c.appendChild(i)},toc_config.delayLoading)}(window,document); } /*]]>*/</script>
copy this code to HTML
6/ Add Slide Image
copy this code
  <a href='https://menghiengtips.blogspot.coml'>
              <img alt='Judul_alt_disini' class='lazy post-thumb' data-src='https://blogger.googleusercontent.com/img/b/R29vZ2xl/AVvXsEg6l8ywGTAj3Lh27AiJoPmcyoEb5QXxnjBvPCSaNEdszRLahMsoB6NaHDQHHaWUuAwWiTvdklkHb0mu_f95nRFT_lXf2dJzF8pAYy0aVFqrv0NZB0xJNAHti18sXKnSyUk-jkhLoxoQrwOl/s0/median-banner-3.png' src='data:image/png;base64,R0lGODlhAQABAAD/ACwAAAAAAQABAAACADs='/>
             </a>
7/ Change Blogger Comments Into Disqus
Change the blogger comment tag
please search and change this tag
<b:include cond='data:view.isPost and !data:view.isPreview and data:post.allowComments' data='post' name='commentShowhide'/> <b:include cond='data:view.isPost and !data:view.isPreview and data:post.allowComments' data='post' name='threadedComments-modifV2'/> code change :<b:include cond='data:view.isPost and !data:view.isPreview and data:post.allowComments' data='post' name='post-commentDisqus'/>
Improvements to the CSS code
To fix this problem, please find and change the style CSS
.Blog .show-comment label{display:block;margin:0;padding:15px;text-align:center;border:2px solid #ebeced} code change :.Blog .show-comment label, .Blog .show-comment a{display:block;margin:0;padding:15px;text-align:center;border:2px solid #ebeced}
Adding your Disqus ID
Find the code set as below and change your Disqus ID
 <b:includable id='post-commentDisqus'>
  <div id='disqus_thread'>...</div>
  <script>/*<![CDATA[*/ var disqus_shortname = "jagodesain"; !function(){var e=document.createElement("script");e.defer=!0,e.src="//"+disqus_shortname+".disqus.com/blogger_item.js",(document.getElementsByTagName("head")[0]||document.getElementsByTagName("body")[0]).appendChild(e)}(); function load_Comments(){var e=document.getElementById("disqusshow");e.style.display="none";var t="jagodesain";!function(){var e=document.createElement("script");e.defer=!0,e.src="https://"+t+".disqus.com/embed.js",(document.getElementsByTagName("head")[0]||document.getElementsByTagName("body")[0]).appendChild(e)}()};/*]]>*/</script>
 </b:includable>


for free diet plan
ReplyDelete